Start with sound, not video
The single rule of ASMR: audio quality beats everything. Viewers forgive a soft-focus video; they leave instantly on hissy, harsh, or clipping audio. Every decision below serves the sound first.
If you're still choosing a microphone, the microphone buyer's guide covers self-noise, USB vs XLR, and which specific mics suit each use case. The guide below assumes you have something to record with and want to use it well.
Get your room quiet
A silent room is the cheapest upgrade you'll ever make. Most beginner recordings are let down not by the microphone but by the room around it.
- Record at night — less traffic, fewer household and street sounds. The ambient noise floor of a typical flat drops measurably after midnight.
- Turn off anything that hums — HVAC, fans, fridges in the next room, PC fans. If you can hear it without trying, the mic definitely hears it. A silent room costs nothing.
- Soften the space — blankets, curtains, rugs, a duvet behind you. Soft surfaces kill the echo that makes audio sound "roomy" and amateur. A dedicated acoustic foam kit is optional once blankets aren't enough — but blankets first.
Microphone technique
A good mic technique matters more than mic price at the beginner stage. These four things fix most of the problems new creators run into.
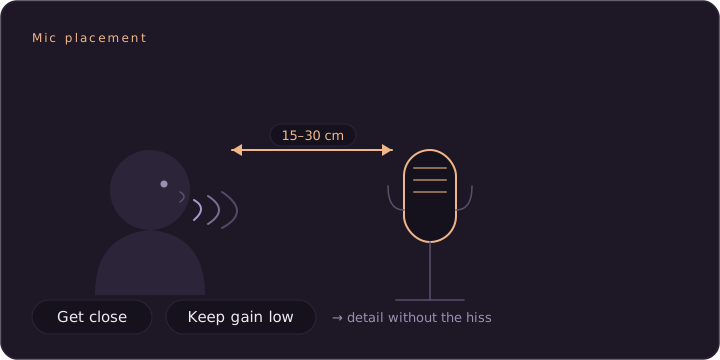
- Get close, keep gain low. Most beginner hiss comes from a mic placed too far away and turned up too loud. Move the mic closer and lower the input gain — you capture the quiet detail without amplifying the noise floor. Six to twelve inches is a reasonable starting distance for whisper content.
- Watch your levels. Aim for peaks well below clipping — roughly −12 to −6 dB in your recording software. Digital clipping is permanent and sounds harsh. Record quiet and bring it up in editing rather than clipping and trying to fix it.
- Tame plosives. Hard "P" and "B" sounds punch the mic diaphragm and produce a low-frequency thump. Angle the mic slightly off-axis (not pointing directly at your mouth) or use a pop filter for soft-spoken and whisper content.
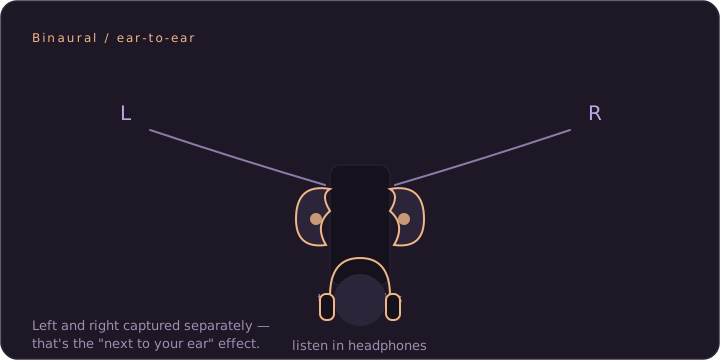
- For ear-to-ear immersion, use a binaural rig. A binaural microphone like the 3Dio Free Space places two capsules at human-ear spacing. Played back in headphones, sounds appear to originate beside the listener's head — the defining quality of personal-attention ASMR. A standard cardioid mic cannot replicate this. Record and monitor in headphones; binaural only works in headphones.
Triggers: pacing beats variety
Beginners tend to rush and switch triggers too often. The quality that makes ASMR work isn't novelty — it's the feeling that nothing is about to change suddenly. Slow down and stay with something longer than feels natural.
- Slow down. Deliberate, unhurried movements are the whole point. Let a sound breathe. If you feel like you're moving too slowly, you're probably getting close to the right pace.
- Consistency soothes; randomness jars. Repeat a trigger long enough for the viewer to settle into it before switching to something else.
- Layer thoughtfully. A quiet background trigger under a foreground one adds depth — but don't stack so many sources that it turns to noise.
- Common starting triggers: tapping, brushing, crinkles, whispering, and hand movements. Each has its own pacing and mic-placement sweet spot — experiment with one at a time before combining them.
Camera angles and framing
Frame before you record and don't move the camera during a take — stillness is calming and any bump transfers to the viewer as a jolt.
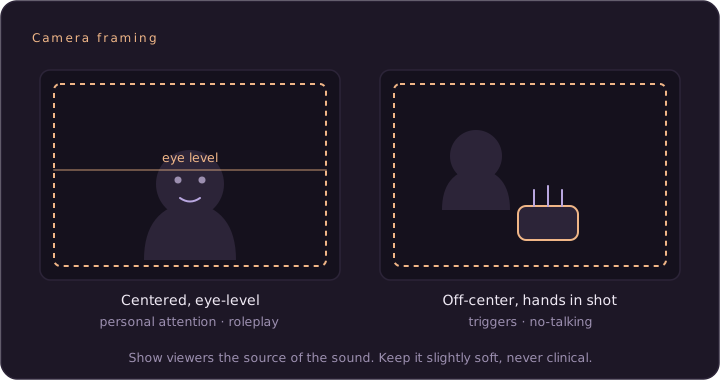
- Eye-level, close, and centered for personal attention and roleplay — it reads as intimate and direct, which is the whole point of those formats.
- Off-center with hands in frame for trigger and no-talking content — viewers want to see the source of the sound, so keep the prop or hands visible.
- Keep it slightly soft, not clinical. Shallow depth of field (blurred background) reads as warm and cozy; razor-sharp 4K can feel cold and clinical. Aim for comfortable, not impressive.
Lighting
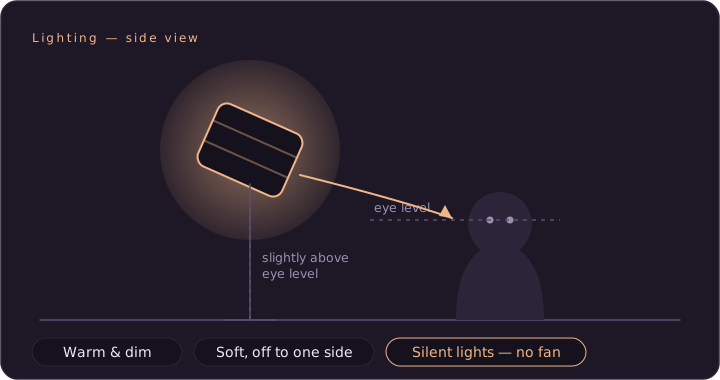
ASMR lighting has one rule: warm and dim. You're helping someone wind down, not presenting a product in a showroom.
- Soft and diffused — a softbox or ring light through diffusion, placed off to one side, avoids harsh shadows and feels natural.
- Warm colour temperature — 2700–3200K rather than daylight (5600K). Warm light is associated with evening and rest.
- Silent lights only. Cheap LED panels with cooling fans hum into the mic. Check before you buy — the Elgato Key Light Air is fanless specifically for this reason.
Performance
ASMR is one of the few formats where a lower-energy performance consistently outperforms a polished, high-energy one. Your calm transfers to the viewer.
- Soft-spoken vs whisper: soft-spoken carries warmth and works for most content. True whispering suits close, intimate material — ear-to-ear, personal attention. Try both and see which your voice takes to naturally.
- Move slowly and stay calm. Your physical pace sets the emotional pace. Rushed hands, fidgeting, or fast transitions break the effect.
- For roleplay: gentle eye contact and unhurried pacing sell the personal-attention feeling more than any script does. The setting is secondary; the presence is primary.
Editing — a light touch
The goal is clean and natural, not radio-polished. Over-editing is a common beginner mistake that strips out the organic quality listeners respond to.
- Gentle noise reduction only. Heavy noise removal adds underwater artefacts that sound worse than the original hiss. Fix the room first; use noise reduction as a last resort, not a substitute.
- Normalise for consistent loudness so viewers aren't reaching for the volume between videos, or between sections of the same video.
- Check your channel balance. Binaural audio must stay properly left/right throughout — any phase or channel error breaks the immersion completely and is hard to detect without headphones.
- Get to the triggers fast. Long intros lose people. A short greeting, then into the content. Pin context and timestamps in the description rather than front-loading the video.
For a step-by-step walkthrough of the editing process itself, see How to edit ASMR in Audacity.
One last thing
You don't need expensive gear to start — you need a quiet room and good technique. The difference between a €35 mic in a treated room with good mic placement and a €300 mic in a bare room pointed at the ceiling is enormous, and the cheap setup wins. Upgrade equipment as your channel grows and the room is already sorted.
Ready to plan your setup? Try the setup builder → — choose your budget and content type and get a specific gear list.